

Learning Those Outdoor Skills
INTRODUCTION
Mountaineering, hill walking, rock climbing, canoeing, caving, skiing, parachuting, diving and sailing are all activities that develop Outdoor Skills or ODS an important component to military training. Individuals who do it enhance and develop leadership, communication and team-working skills.
The ancient Japanese Samurai believed in the Ying and Yang of the universe. A complete warrior in both body and in spirit had to achieve balance. They spent long hours perfecting their fighting skills, but they also spent time drawing, flower arranging and painting, writing poetry and performing plays. They were thus able to make sense of the horrors that they both witnessed and carried out. They knew that without this balance, the warrior rage would probably consume them.

Climber Rockface
Participating in ODS activities gives soldiers a chance to plan, organize, improve their skills and gain knowledge from more experienced individuals and all in a relatively safe environment.
They learn how to motivate both others and themselves, you can also get a good insight into an individual’s characters when they are wet, lost, tired and hungry and generally Pee’d off. Will they see the task through to the end or will they just throw in the towel.
THE COUNTRYSIDE CODE
If in the countryside whether you are participating in land based eg. rock climbing or water based eg. canoeing activities, whether training or taking a temp rest or setting up camp, you will be required like everyone else to adhere to the Countryside Code.
There are 5 sections to the countryside code, which aide members of the public to respect, protect and enjoy the countryside. More detailed information can be gained from ‘Natural England’. The following is a brief summary of the 5 sections of the Countryside Code (taken from “Natural England”)

The Countryside Code
BE SAFE, PLAN AHEAD AND FOLLOW ANY SIGNS
When going out into the countryside, it is best to get the latest information about where and when you can go, as there may be restrictions on your rights to enter some areas of open land, i.e. during breeding seasons.
All ODS activities will require planning therefore the more one plans ahead, the greater the opportunities there are of reducing the risk of injuries. Some ways of staying safe are to refer to up-to-date maps, understand different weather conditions, be in possession of the latest weather forecast prior to setting out, informing others of your route showing where you’re going and when you expect to return, an understanding of signs and symbols used in the countryside and to follow the country code.
LEAVE GATES AND PROPERTY AS YOU FIND THEM
The working life of those living in the country must be respected and the actions of those that visit the countryside can affect livelihoods, welfare of animals, our heritage and not to mention the safety of animals and ourselves.
- Farmers may leave gates closed to keep livestock in and occasionally may leave gates open so animals can reach food and water. All gates should be left as found or follow the instructions on any signs. If walking in a group, ensure the last person knows how to leave the gates.
- If crops are growing in fields, follow the paths wherever possible to reduce the risk of crops being damaged/ruined.
- Use gates, stiles or gaps in field boundaries when provided - climbing over walls, hedges and fences can damage them and increase the risk of farm animals escaping.
- Do not disturb ruins and historic sites as our heritage must be protected at all times.
- Leave machinery and livestock alone - don’t interfere with animals even if you think they’re in distress. Try to alert the farmer instead.

Leaving Gates And Property as You Find Them
PROTECT PLANTS AND ANIMALS AND TAKE YOUR LITTER HOME
Everybody using the countryside has a responsibility to protect it both now and for future generations so ensure animals, birds, plants and trees do not come to any harm.
- The dropping of litter and dumping of rubbish not only spoils the countryside but could be dangerous to wildlife and farm animals. All litter/rubbish must be taken home and not left in the countryside.
- Removing, damaging or destroying features such as plants, trees and rocks may affect how wildlife lives, potentially affecting the food supply and homes of wildlife.
- Take care not to drop smouldering cigarettes or lighted matches as fires can devastate wildlife and habitats.

Protect Plants and Animals
KEEP DOGS UNDER CLOSE CONTROL
Dog owners use the countryside to exercise their pets but it is the owner’s duty to ensure that their dogs do not become a danger or a nuisance to farm animals, wildlife or other people using the countryside. Below is an outline of this country code and more detailed information may be sought by contacting the ‘Open Access Contact Centre’
- The legislation states that owners must control their dogs when in open country and common land (known as ‘access land’) and dogs must be on a short lead between 1st of March and 31st July, and all year round near farm animals. By law, farmers can destroy dogs that cause injuries or worries to their animals.
- Dog mess can cause infections so get rid of mess responsibly and worm dogs regularly to protect it, other animals and people.
CONSIDER OTHER PEOPLE
The countryside can be a pleasant environment for everyone if all shows respect and consideration to others.
- Small country roads can be dangerous not only to people but to wildlife so care must be taken when driving, as farmers may use roads to move animals between fields, walkers/ cyclists may have to walk on roads that have no pavements and many country folk use horses. Respect the local people by not blocking driveways, gateways or entry points.

Considering other people
ROPES AND BELAYS ODS ACTIVITIES
Many ODS activities involve the use of ropes and belays to prevent injury and for individuals to safely achieve their objectives. Some examples of ODS activities that may require the use of ropes and belays are mountaineering, rock climbing, ice climbing, caving and hill walking.
Equipment manufacturers have made a real effort to make all ropes and belays as light as possible and the advancements made in many aspects of such equipment has impressed those who have participated in adventurous training activities over the years. Although this has its advantages, considerations must be made to ensure the ropes and the belay devices used are suitable for the task to reduce the impact force if a fall occurs whilst participating in ODS activities.
The impact force is a force transmitted between a person secured to a rope, i.e. a climber, and the other elements of a system at the precise moment a fall is arrested. A rope will absorb much of the energy created when a falling climber comes to a stop however, the belayer, the climber and the top runner will also absorb some of this energy. It is therefore imperative that not only do ropes need to be kept in excellent condition, but it is advantageous to have an understanding of what the maximum impact force (MIF) of the rope is, as this provides an indication of its energy absorption characteristics.
Modern ropes and belay devices have many qualities, but that brings with it many nuances, especially as ropes can vary in quality, elasticity, weight and handling characteristics. It is worth taking the time to understand the different options and characteristics of ropes and belay devices in order to make an informed choice for the type to be used.
Information about ropes and belays can be gained from businesses that specialise in climbing/mountaineering equipment or from organisations such as the Army Mountaineering Association (AMA) and the British Mountaineering.
KNOTS AND THEIR USES
A lot depends on knowing how to tie just the right knot or hitch for a particular job.
While learning to tie knots it is of no use using a thin string or twine made up of loose strands. You need a piece of rope or cord not less than a quarter of an inch thick and several feet long. An important point to remember is that it is not a good idea to ever cut a rope just to shorten it, as you will find that no sooner had you cut it, than you needed a longer rope for some other purpose. As mentioned in the Expedition Training, it is always useful to have a length of string or rope with you, but there is not much point in having a rope if you don't know how to tie a useful knot in it. Like most skills it is only through practice that you will become proficient, this is especially so with knots.
The occasion you need to use a knot will more than likely be in an emergency situation, you must realize that this will mean instant re-action with no time to think of what to do. This is when your ability to tie the — "right knot at the right time" — could prevent a disaster.
A ROPE
The main part of a rope is called the "standing part" - see illustration. When the end is bent back toward the standing part, the loop formed is called a "bight", regardless of whether it crosses the rope or only lies parallel with it.

Parts of a rope
KNOTS AND THEIR USES THUMB KNOT and FIGURE OF EIGHT KNOT Both used to make a ‘stop’ on a rope: to prevent a rope from fraying at the end.
REEF KNOT. For joining two dry ropes of the same size. The most generally useful knot. Always used in First Aid
SINGLE SHEET BEND. For joining two ropes of different size.
DOUBLE SHEET BEND. For joining two wet ropes of different size.
HAWSER BEND. For joining larger ropes or cables.
DRAW HITCH. For fastening a ‘head rope’ (e.g., a boat’s painter) so that it can be quickly released.

Knots and rope
CLOVE HITCH This is the most useful knot that you will ever learn. It can be made under strain, will not slip on itself nor along a pole, and can easily be cast loose.
TIMBER HITCH This is useful for hauling, the more it is pulled the firmer it holds.
TWO HALF HITCHES. Two turns of a rope, which, when drawn together, holds securely. It is the quickest and simplest way to make a rope fast to a post.
ROUND TURN and TWO HALF HITCHES. The quickest way to make a rope fast under strain. One of the most useful and easily made knots .
FISHERMANS BEND. For fastening ends of ropes to spars, poles, etc., or to other ropes.
BOWLINE ON THE BIGHT To form a loop that will not slip. One loop is made larger than the other. This is the sling for lowering a person from a building. It enables the person to be supported, with the longer loop under the knees and the short loop under the armpits.

Knots and rope
THE SPANISH WINDLASS
This is not a knot, but is closely related to them. You may come across a situation where knowing how to use a Spanish Windlass could be helpful.
The windlass as you will see from the diagram gives you great pulling power on a rope by means of a lever using it to wind the rope around a post or stake, one end of which is in the ground.
The rope is wound round the post and a horizontal bar or piece of wood that is secured to the vertical stake using a rope hitched over it.
The power given could be used to haul a boat out of the river or to move a vehicle. One end of the rope is fastened to the object to be moved, and the other is made fast on to a tree or some other suitable anchor. The stake or post must be strong and sound, likewise the material used for the lever as there is considerable pressure on both when in use.
Check your rope for any damage and be sure it is strong enough for the job.
Arrange your rope as in the diagram, pulling the lever round the stake.
The stake needs to be held firmly by driving it into the ground making the hole big enough for it to turn. It may be necessary to check and re-site your windlass as too much rope may be wound round it, it will depend upon the size of the stake used for the windlass and the distance you have to haul the object.

The Spanish Windlass
Warning - it can be dangerous if you do not use strong enough material, if it snaps or if you let go of the lever.
Check your rope and Windlass frequently, always secure the load you are pulling with other rope to prevent it running away in the event of an accident.
LASHINGS
Lashings are used for fastening poles or spars together. They should be finished with a reef knot when both ends of the rope or yarn are available, or with a clove hitch if only one end is available.

Lashings outdoor skills
a) Straight lashing to spars.
For lengthening a spar or for repairing a broken spar. The lashing is made fast to the spar with a clove hitch, and is then passed round and round the spars; the end is made fast by another clove hitch or by passing the end under the last few turns and then tightening them up.
b) Square lashing.
For lashing one spar to another at right angles. The lashing is started with a clove hitch, con sists of at least four complete turns round the spars and two or more frapping turns, and is finished with two half-hitches round the most convenient spar.
Shear Legs Lashing
For lashing spars at adjustable angles. The spars are placed side by side; a clove hitch is made round one spar and the rope is taken loosely six or eight times round both spars above the clove hitch without riding. Two frapping turns are made round the lashing and the end of the rope is made fast to the other spar by two half hitches just above the lashing.

Shear Legs Lashing
DISCIPLINE OF PERSONAL HEALTH AND HYGIENE
Participating in ODS activities may require individuals to spend time away from home and in different forms of accommodation. Care must be taken to ensure that individuals personal health and hygiene does not suffer as can have a effect on ones health It can be a deciding factor whether one achieves the task. Below, are some tips on how to administer oneself.
TAKING CARE OF YOUR FEET
If walking long distances, then ways of looking after ones feet must be considered, sore feet/injuries to feet will prevent objectives being achieved.
“Tightly fitting boots are uncomfortable, and can reduce the circulation of blood to your toes”
THE CORRECT FITTING OF WALKING BOOTS
Walking over arduous terrain may require walking boots that provide good ankle support.
When purchasing a pair of boots, ensure you wear thick socks (preferably woollen) and take into account that the size of boot required could be half a size bigger than your normal shoe size as your feet can swell when walking long distances. Tightly fitting boots will not only feel uncomfortable but may reduce the circulation of blood to your toes, thus potentially creating medical problems, e.g. cold weather injuries to your toes if walking in wet/wintry conditions.
There are many different types of boots but no boot will guarantee keeping your feet dry (as it depends how long the boots are being subjected to being immersed in water) it can be personal preference whether the boot purchased is an all leather that regularly requires polishing or whether the boot is Goretex. Remember though, that all boots will let water in after prolonged walking in wet conditions. So wet feet are inevitable.
WEARING GAITERS
One way of keeping feet dry is to prevent water from soaking through the boots. If the activity conducted requires walking for long periods on wet ground due to rain or through bog, then one preventative measure is to wear gaiters.
Some types of gaiters may have been specifically made for a particular type of boot, i.e. ‘Yeti Gaiters’. This Gaiter, not only covers the lower half of the leg, thus preventing water running down the legs and going into the boots, but covers the boot as well, thus reducing the amount of water touching the boots.
Feet can remain dry for many hours when walking in wet conditions if the correct equipment is purchased, protecting feet from injuries not to mention the comfort factor of having dry feet.

Wearing Gaiters
REDUCING INJURIES TO FEET
Walking over arduous terrain feet suffer from blisters, soreness. Measures should be taken to prevent or reduce the risk of injuries to feet. (Prevention is better than cure).
Our feet are different as are boots, some people chose to wear no socks at all, try out a few different variants till you find the right one for you, but don’t try out a radical new combo at the beginning of an epic unsupported expedition, do it locally.
WOOLLEN SOCKS
Wear well fitting woollen socks because if feet get wet, then the water can cool down the foot’s temperature. By wearing woollen socks, the wool will retain heat around the foot (better than cotton socks) thus reducing the risk of the feet suffering from cold weather injuries (frost nip/ frost bite if in wintry conditions).
Woollen socks can reduce blisters when walking over arduous terrain because as the foot moves around in the boot, the foot rubs against the sock material.

Woollen socks
This friction is what causes blisters therefore sock material made from wool can reduce the friction between the foot and sock material thus reducing the risk of blisters occurring. (Assuming the boots being worn are correctly fitting boots as blisters can occur through ill-fitting boots).
BREAKING IN BOOTS
Brand new boots should always be broken in, you allow the boot to mould to your feet. They’ll be more comfortable and can reduce the amount of friction between the boot and the foot, thus reducing the risks of getting blisters.
There is no “dark art” just put them on and walk about, wear them at home, walking the dog, just get used to them, walk to work in them.
CLEAN SOCKS
Feet sweat when wearing boots all day, so you’ll need to think about changing your socks regularly. It may not always be practical to change socks so dust feet with anti-fungal foot powder at the beginning of the day. This reduces the risk of the feet suffering from ailments like ‘athletes foot’ and may also soak up some of the sweat created.
“Athletes foot is a right pain, and takes some getting rid of when you’ve got it, so take care of those feet”
One way of reducing the risk of blisters and soreness to feet is to tape vulnerable areas of the feet with ‘Zinc Oxide’ tape. This tape acts as protection to the foot/toe/heel as the friction created in the boot is not rubbing directly onto the foot, but between the boot, sock and the zinc oxide tape. Taping vulnerable areas of the feet/ toes/heels with zinc oxide tape does not guarantee total protection from soreness or blisters, but it can delay them.
DRYING BOOTS IN THE FIELD
When you’ve made camp, boots should be allowed to air and dry naturally (not in front of direct heat, as this will probably scorch the leather, burn the goretex) and feet should be aired. Carrying a pair of trainers in your bergen means you can take your boots off but still cut about, use an old tatty pair that you don’t train in anymore.

Drying boots off in the field
Stuffing newspaper in boots can help to draw out some of the water and if you can lay your boots on their sides rather than standing them up, the air can circulate easier and they’ll dry quicker.
All zinc oxide tape should be removed from feet and ideally, feet should be cleaned with water before putting on a pair of dry socks.
DRYING SOCKS IN THE FIELD
The socks you wore that day will probably be damp from sweat/ water, so, if you want to wear them in the morning you’ll have to try and dry them out. If they are soaking wet with sweat, the salt will wear them out quickly, so if you can, wring them out in a river or lake.
Drying socks may be difficult if the weather is particularly cold or wet however one way of drying socks is to sleep with the socks in your sleeping bag, against warm parts of the body.
One of the warmest places of the body is the armpits, socks can be tucked under the armpits during the night as the body heat will help to dry the socks, I prefer to have them inside my trousers as I sleep, lay each sock down each leg with the top tucked over your belt. Don’t sleep in wet socks for long periods you’ll completely knacker your feet.
SPARE CLOTHES
Clothing may have to be washed or worn more than once (including socks). It is good practice to ensure that when sleeping at night, a dry set of clothing is available to be worn. This may mean that clothes designated to be used when sleeping, are never used during the ODS activity, even if it means damp/wet clothing have to be put back.
WASHING OR BATHING
Not washing for a couple of nights will not usually create a problem hygienically but if the activity is over many days and nights, then it is good practice to regularly cleanse the parts of the body that are susceptible to sweating. Wrapping a facecloth in a freezer bag, along with a bar of soap in a small towel will enable individuals to have a strip wash.
BRUSHING TEETH
The brushing of teeth is an important factor in the fight against tooth decay, a freezer bag with a toothbrush and a tube of toothpaste should be packed, and its amazing what a pick me up brushing your teeth can be when its the only “wash” you’re going to get.

Brushing teeth tooth brush
CHANGING CLOTHES
You’ll have to change underwear and socks, so plan what clothes to take, how long items of clothing should be worn for, whether clothes should be washed and if so, whether there is time for them to dry. A small freezer bag containing washing powder should be taken.
FOOD CONSIDERATIONS
It is not unusual for individuals participating in ODS in wintry conditions to consume over 5000 calories or in summer conditions for individuals to drink over 5 litres of fluid.
A diet plan should be considered before venturing out on any AT, to ensure that individuals are consuming not only the correct calorific content, but are consuming a diet suitable for the activity. Organisers activities have a responsibility to ensure all participants are consuming the correct amounts of protein, carbohydrates, fats. This includes replacing salts that may be lost during the day. By not eating and drinking properly, individuals run the risk of reducing their energy levels and dehydrating, which could have disastrous consequences.
Is the cooking going to be centralised or are individuals going to be cooking for themselves. Boil in the bag military 24-hour ration packs are ideal. Hot sugary drinks i.e. hot chocolate, tea, coffee can be made from the hot water that is used to warm the boil in the bag food and is a way of replacing sugar levels lost during the day's activity. Sugary hot drinks also helps to warm the body in a cold-weather environment.
All food should be protected to ensure it’s not contaminated or boil in the bags are not punctured, therefore, consider where food should be packed. It is good practice to keep all boil in the bag foods in some sort of protective plastic bag to ensure that dirt and contaminants do not contaminate the water that not only heats the boil in the bag, but is then used for a hot drink.
It may be useful for individuals to pack food products in Tupperware boxes for protection. I.e. salt sachets, pepper sachets, Tabasco sauce, sugar sachets as this can help to contain and protect food products.
WATER
Always take from reliable sources. If water has to be taken from streams, the water should be from a flowing stream and ideally from a higher altitude than buildings, the inhabitants might defecate in the water, wash clothes in it etc... If you fill your bottles from a stream then check at least 30 metres up stream for dead animals and other things that may make you sick.
Never take water from areas where fresh water does not flow, as the water could be stagnant. Water may have to be purified with tablets or iodine if not from a reliable source.

Water Puritabs
All cooking vessels, crockery and cutlery should be cleaned thoroughly before and after eating therefore a small container with washing up liquid in it and a pan scrub could be carried in a freezer bag and kept with the cooking vessel when not in use.
When you return from an exped, give your camel back a good clean out, a friend of mine trained for 6 months for a canoe marathon, and on the day of the race used a camelback that had been sitting in his bergen for 3 months, he dropped out of the race within hours of taking his first gulp. All that work utterly wasted.
LATRINES
One of the functions of the body is to get rid of body waste, when you’re disposing of yours consider where you’re doing it, as there could be consequences to oneself and to others. Urinating or defecating near streams could result in body waste running into the water as the ground could be wet or the rain could wash waste products into the water, which in turn, can be consumed by others collecting water further down stream. Urinating and defecating near campsites during times of rest may attract flies, which in turn, can land on food being prepared or eaten.
Designated latrines should be established if at a campsite, or if a joint latrine is not established areas should be identified where it is suitable to urinate and defecate. (All solids should be buried).
Individuals may find that wet wipes keep areas of the body cleaner than toilet roll, as a personal SOP. I always keep a few sheet in my pocket when out and about, even cycling/running/tabbing because you just never know do you?
After going to the toilet, hands should always be washed for hygiene reasons, however, opportunities to access running water may not always be available therefore carrying antibacterial hand cleaner may be useful.
SITING OF YOUR LATRINE
Common sense is the important issue when siting your latrine, as a rule of thumb think, down wind and down stream from your camp and a suitable distance and clearly marked.

Outdoor Skills survival Aids
72HR MEDIKIT
First aid kit is only as useful as the training you bring to it, the layout below will enable you to deal either with multiple casualties, or one casualty over a several day period, it contains all you need to treat a wide variety of injuries and conditions.

Medical Pack Kit
This is a sample of the contents:
- 2 x medium ambulance dressings
- 1 x large ambulance dressings
- 4 x small sterile dressings
- 2 x medium sterile dressings
- 2 x large sterile dressings
- 4 x triangular bandages
- 3 x prs Nitrile exam gloves
- 3 x gauze swabs (5)
- 1 x pr tweezers
- 6 x safety pins
- 1 x 7.5cm crepe bandage
- 1 x 10ml bottle Tea Tree oil
- 1 x laminated casualty card
- 8 x antiseptic wipes
- 1 x resuscitation shield
- 3 x vials saline solution
- 1 x tin Vaseline
- 1 x roll zinc oxide tape
- 1 x 75cm strip fabric plaster
- 1 x pr EMT shears
- 1 x guidance leaflet
SAFETY and EMERGENCY PROCEDURES
EMERGENCY MESSAGES The Police are responsible for calling out the rescue services. The information they will require is as follows:
a. The exact location of the injured person(s), with a six figure grid reference and a description/landmarks of the area for a Helicopter Pilot to identify.
b. The number of persons injured and their name(s).
c. The nature of their injuries.
d. The time of the accident.
g. Those going for help must remember the area and landscape with any particular reference point to help find the site on return with a rescue party.
WAITING FOR HELP TO ARRIVE
Those looking after the injured, should set up shelters and carry out emergency first aid, with special reference to the prevention of hypothermia/exposure. It will be necessary to mark the site with light coloured clothing or bandages on sticks where they can easily attract attention.
A RED FLARE, A RED SQUARE OF CLOTH or a FIRE
Also recognized International Alarm Signals. The shape of each signal can be made by setting out clothing or items of kit or, a person taking up the shape of the letter standing up or lying down. Get help, attract attention in any way you can. Be alert and watch out for the rescue party to guide them in the quickest route. Make yourselves as comfortable as possible, "brew-up", eat HOT food, keep together, keep warm, keep up the morale.
SUMMARY OF WHAT NOT TO DO
1. Not involving senior, more experienced members of your unit and getting permission in the first place to carry out an "expedition".
2. Insufficient detailed preparation, planning and training - RECCE not done properly, no rehearsals. Menu not planned for type of area travelled and emergencies.
3. Not being properly equipped or dressed - especially wearing unsuitable clothes and useless footwear.
4. Carelessness or casualness by you and those taking part.
5. Over estimating your own and others physical strength and the stamina required.
6. Not having enough practical experience and practice - especially map reading and camp craft.
7. Not paying enough attention to detail, not being observant - failing to notice soon enough to take action due to changes in the weather conditions.
8. Not turning back early enough - when common sense said "turn back".
9. Not noticing a member of the team "flagging"- getting left behind.
10. Failing to work together as a team - getting in a panic.
11. Not accepting advice from experienced people, while en-route.
12. Failing to give Route Cards, Map References of RV’s and timings and other information IN WRITING to anyone before departing.
13. Failing to keep to the agreed routes - not advising of changes.
14. Splitting up group loss of use of full compliment of kit, rations and physical resources/skills.
15. Not bothering to cook hot food or make hot drinks.
16. Not taking sufficient care of feet and poor personal hygiene
GO FLY - A SURVIVAL KITE
A Pocket-Sized piece of kit to rescue those lost on an expedition or lost as darkness falls being kitted out with a Survival Kite may ensure help arrives sooner
The size of a cigarette pack, the kite is inflated by mouth to become a two square metre metallic aerofoil beacon for search parties. It will take to the air in winds as low as just 4 mph. Its flight is so stable it remains airborne while survivors sleep. The Kite reflects radar signals and its visibility can be further enhanced by adding a small “light stick”, the brightly glowing chemical indicator.

Survival Kite
Other uses, it can be worn as a vest under outer garments directing heat back to the body or wrapped around a broken limb and then inflated and used as a splint.
COOKING IN THE FIELD
Brewing up and a hot scoff in any weather is morale boosting. Though not an in depth instruction book on cooking in the field here are a few tips.
There are lots of cookers on the market and most of them are pretty robust and soldier proof. As part of your prep get your stove out and have a practice with it, especially if it’s brand new.
However, before you invest your own money there’s nothing wrong with the issue hexamine cooker. Ok you can’t turn the heat up and down but you’re not on “ready steady cook” You can’t break it or damage it, it doesn’t have nozzles, hoses or washers and it’s free, lightweight and takes up very little room.
- To get the most heat out of the hexi, cover the mess tin with a lid, it will heat up a lot quicker if the steam can’t escape.
- You don’t need to heat the water to boiling point for food or a brew, you’ll only have to wait till it cools down again to drink it.
- Don’t fill your mess tin to the top with water, a full mess tin with boiling water will be hazardous to handle.
- Fill your mug up with cold water then tip this into the mess tin to heat up, that way you’ve got the right amount for your brew, and you’re not wasting hexi, then pop your boil in the bag in.
- Break the hexi block into 4 chunks and place the quarters at each corner of the burner, you’ll get more heat this way.
- Hexi cookers do give off a lot of light though and the fumes can be noxious, so ventilate the area if you’re brewing up indoors.
- When you brew up, put your hot scoff on, take an extra ten minutes to fill your flask up, when you’re wet and tired knowing that you’ve got a hot cuppa ready to go when you stop can be a real boost, you can get small flasks that will fit into a jacket pocket.
SOLDIERING PRINCIPLE
When you’re soldiering you should definitely adhere to the principle of Your Weapon, Your Kit then Yourself in order of priority, but your stove can be heating up your water while you’re battle cleaning your weapon, concurrent activity.
OPEN FIRE COOKING
Cooking on open fires doesn’t require a huge bonfire, you’re not roasting a buffalo, what you’re after is a small fire with Red Hot Embers and no smoke, always try and use dead wood if you can.
Cut out a chunk of turf from the ground and make yourself a small fire pit, ensure that the air can get to it by widening the sides, keep the turf ready to put it back when you’re done or if you need to leave in a hurry and want to mask your tracks.
- Before you light your small fire gather enough dry wood and fuel to keep it going for a while, you don’t want to spend ages getting it going then it goes out when you go looking for more.
- When building the fire start with very small twigs and dry grass, or thin bark from trees, then slowly build it up, and don’t make it too big, to cook with a mess tin you only need a very modest fire, look at how small the hexi block is.

Open Fire cooking
THINGS TO THINK ABOUT WITH AN OPEN FIRE
- Seek permission first from the land owner (if applicable)
- Always think safety when using Open fires
- Don’t leave it unattended
- Put it out before you get your head down
- Always put it out when you move on and make sure it’s properly out, if possible dowse it with water. Fires have a nasty habit of re-igniting and can cause terrible damage to livelihoods and wild animals, and they kill.
OTHER METHODS OPEN FIRE COOKING
- You can place your little fire between two bricks or two lines of brick
- Two thick branches, in a rut in the ground, scrape a little trough out.
- You can make a little stand with four nails or even tent pegs and place the mess tin on them, but be careful, don’t forget that you are boiling water, so your mess tin needs to be steady, you don’t want to burn yourself with it.

Mess tins open fire cooking
Don’t put your rubbish in the fire and leave it, always take your rubbish away with you, it is poor drills to leave you waste behind.
IMPROVISED SHELTER
“Any fool can be cold, wet and miserable, but a good soldier can make himself more comfortable anywhere” Occasionally you’ll have to make do with what you’ve got to hand to make some shelter, the first thing to do is to get into whatever cover is available and get out of the wind. The wind can sap your body heat away and heat = energy, if you’re in the snow then dig yourself a small hole big enough for you and your kit, you’d be amazed at how much warmer it is just getting yourself out of the wind, and this applies to any area.

Improvised Shelter
If you’re in more temperate zone, you can use your Bergen as a small wind break, but you can also use you smock/combat jacket/goretex jacket to make a small shelter which will give you a small amount of overhead cover. Thread some sticks or branches through the sleeves to make a small teepee. If you’ve got all your gear with you but there’s not a tree in site and nowhere to sling a basha up, you can use your Bergen, drape the poncho over the top, and peg the corners down normally.
"Any fool can rough it, but a good soldier will make himself comfortable under any conditions"

Emergency Basha

Improvised Basha Shelter
QUICK BIVI
A groundsheet shelter against a fallen tree trunk for one person. The ground sheet must be on the side of the trunk away from the prevailing wind. Another groundsheet type of shelter for one person. The rope must be strong and the open side of the groundsheet away from the prevailing wind.
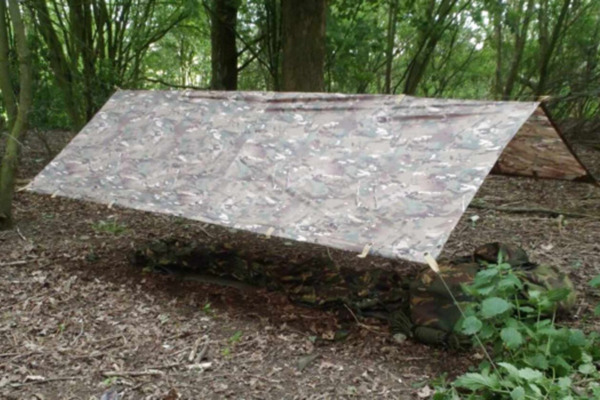
IMPROVISED BASHA
Using a string between two supports, tie groundsheets over the string, pegging the bottom edges to the ground. This type of "tent" can also be put up against a fence or wall using one half of the tent as shown on the right as a triangle A - B - C

Improvised Basha groundsheet
To make a Basha for two you need two groundsheets, string or bungees, pegs (pegs or strong twigs) are useful (6 or 8 are needed). A length of strong string is always useful to have in your kit.
REFERENCE WEBSITES Natural England www.naturalengland.org.uk The British Mountaineering Council www.thebmc.co.uk/ The Army Mountaineering Association www.armymountaineer.org.uk The RAF Mountaineering

David Byrant illustration